DIRECT TO GARMENT PRINTING BASICS (DTG)
Direct to Garment Printing or DTG is a print process that utilizes an inkjet printer to print textiles. It’s a relatively new technology that is quickly becoming a part of every modern print shop.
DTG Pretreatment
If we’re talking about DTG we should probably start with the pretreatment process. A good pretreatment system is crucial to any successful DTG project. So what is pretreatment? Think of pretreatment like a primer that’s applied to the fabric to prevent the inks from soaking into the material dulling the print colors.
It’s especially need on dark garments where a white printed underbase is necessary. Ideally you want your white ink to set up on top of the fabric opposed to soak in, this will keep your CMYK inks vibrant and prevents dot gain.
Pretreatment also functions as a starch of sorts matting the fibers down on the garment. This is done with a heat press after the pretreat is applied. This prevents fibers from showing through in the print and creating a poor ink coverage appearance.
Pretreatments final function is to create a bond between the ink and the fabric. Like we talked about above you want the inks on the fabric not necessarily in it so the pretreatment acts like the anchor under the ink to the fabric. This is crucial to the durability and wash resistance of the print.
Because the pretreatment is applied to the general area of the print it can create a stiff feeling hand to the fabric. Particularly on fleece or thicker knitted materials. This will dissipate after washing which we recommend before wearing.
Art File Tips for DTG
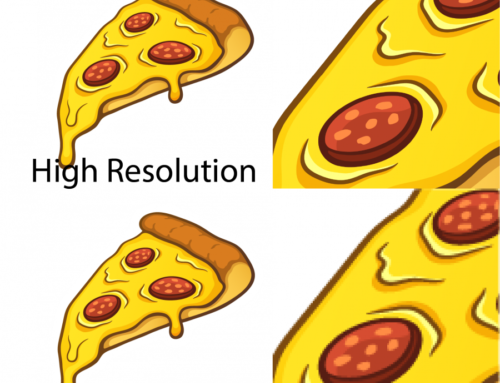
I don’t want to gloss anyone over here so keep in mind that we’ll do what’s needed to prepare your file. However if you want to make the most out of your project it’s good to know a little about how resolution works and what files are going to produce the best print results.
So like any printing process you’ll want your file format to be in vector or high resolution bitmap. We always recommend creating your art file at the same size you want to print it at. This way the resolution is retained and the print size is accurate to your request.
Although most DTG printers use CMYK inks it’s best to generate your art in the RGB color gamut. This is because most CMYK files cannot support transparent backgrounds and the RIP software creates a closer color match from RGB files. While we’re on RIP software let’s talk a little about what it is and how it works. The RIP software is the program use to convert your image into bitmap information that the printer can read.
A good RIP software can be an important as a good DTG. printer. The professional grade software we use can configure the art file to use shirt color in the art if possible. It also allows you to adjust various levels to perfect the print during production.
The DTG Print Process
So like we mentioned above the DTG inks pass through an inkjet head in the printing process. Because of this they have to have a very low viscosity and with that comes relatively low opacity. This is where the base plate comes in, on any dark garment where you have bright print colors a base plate is necessary.
A baseplate is a silhouette first printed under any area where bright colors appear in the printed image. This allows the CMYK inks printed onto the white base to partially or entirely mask colors from the white background. Without getting to technical the CMYK ink filters the light that would otherwise be reflected from white which is every color in the spectrum. So a stable white is crucial to vibrant and color accurate prints.
DTG inks are water-base making the prints soft, thin and breathable. When printed on white or very light colored garments where a base plate isn’t necessary the feel of the prints is almost more like a dye than a film. Even with the base plate white DTG prints have a very soft hand to them.
Curing DTG Prints
Just like screen printing the durability of the print comes from how well it’s cured. Both undercuring and overcuring can result in a print that cracks, peels and fades quickly. With DTG the garments go through two curing stages; the pretreat and the print. Both have to be done correctly to create a print that will hold up to wash after wash.
If the pretreat isn’t cured properly the white ink will soak into the garment. Fully dried pretreat creates a flash cure like effect that keeps the ink on top of the fabric. This optimizes the white inks opacity and creates a smooth substrate for the other colors to go down in.
Curing the print properly is just as important as the pretreat. Since the inks are water-based it’s important to fully evaporate any moisture from the inks when curing. We have natural gas powered conveyor dryer that is ideal for this process. It takes 2-3 minutes at 330º to properly cure the inks. A good sign that the inks have been properly cured is that they are no longer tacky to the touch and don’t easily separate when stretched.
Thanks for taking the time to go over Direct To Garment Printing with us. Hopefully this information will help empower you as the customer when initiating a DTG project.
DTG Printing on Fleece

DTG Printing on White

DTG Printed Novelty Tees

High Color Counts With DTG

DTG Printing on Cotton / Poly Blends


